how to sharpen lawn mower blade easily is mostly about two things: keeping the blade angle consistent, and not taking off more metal than you need.
If your mower starts leaving ragged tips, missing patches, or it “chews” grass instead of slicing it, the blade is usually the culprit, not your grass seed or your mowing pattern. A sharp edge cuts cleanly, which often means a healthier-looking lawn and less strain on the mower.

One quick reality check: “razor sharp” is not the goal. You want a crisp cutting edge, but mower blades hit sand, twigs, and the occasional rock. A durable edge beats a fragile one every time.
What a Sharp Blade Changes (and What It Won’t)
A sharpened blade usually fixes the most common mowing complaints, but it won’t solve everything. Knowing the difference saves you a lot of frustration.
- Cleaner cut grass, which often reduces brown tips and stress on the lawn.
- Better mower efficiency, because the engine does less “tearing” work.
- More even stripes and finish, especially on taller grass.
What it won’t fix: scalping from mowing too low, uneven cut from a bent blade, deck issues, or a worn spindle/bearing. If the mower vibrates hard, don’t sharpen first, inspect for damage.
Quick Self-Check: Do You Need Sharpening or Replacement?
Before you pull tools out, do a fast evaluation. Many people sharpen a blade that should really be replaced, or they miss a safety issue.
- Grass tips look shredded or frayed after mowing
- Mower needs extra passes to “look done”
- Blade edge looks rounded, nicked, or shiny and smooth
- You notice extra fuel use or bogging in normal grass
Replacement is often the smarter move when you see cracks, deep chunks missing, severe bends, or a blade worn noticeably thin near the edge. If you’re unsure, a local mower shop can confirm quickly.
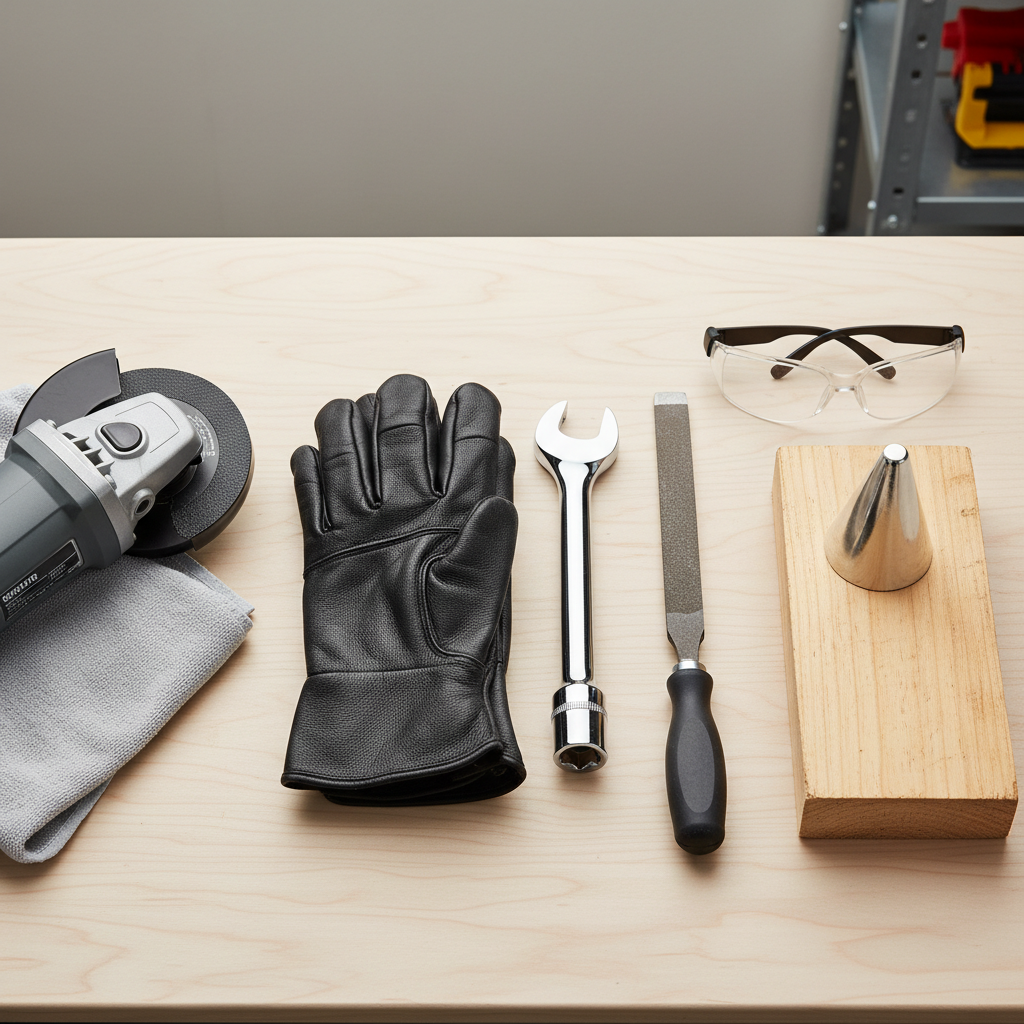
Tools and Setup: The “Easy” Way Starts Here
The easiest sharpening job is the one you set up correctly. You don’t need a full workshop, but you do need stability and basic safety.
- Work gloves and eye protection
- Socket wrench or breaker bar (blade bolt can be tight)
- Blade removal block (a scrap 2x4 works) to stop blade rotation
- Metal file or bench grinder or angle grinder with flap disc
- Blade balancer (cheap cone style) or a nail-in-stud backup method
- Torque wrench (recommended) for reinstall
Safety note: Disconnect the spark plug wire before you touch the blade. For battery mowers, remove the battery. According to OSHA, controlling hazardous energy sources is a core part of preventing unexpected start-up during servicing, and a mower blade is not where you want surprises.
If you tip a gas mower, many manufacturers prefer tipping with the air filter and carburetor side facing up to reduce fuel/oil leakage, but the right orientation can vary. Check your owner’s manual when possible.
How to Remove the Blade Without Fighting It
This is where “easy” often turns into “why won’t this bolt move.” A couple habits make blade removal much smoother.
- Block the blade with a 2x4 so it can’t spin.
- Spray penetrating oil on the bolt, wait a few minutes if it looks corroded.
- Use the correct socket size and steady pressure, avoid stripping the head.
- Take a quick photo of the blade orientation before removal.
Keep track of washers and any blade adapter parts. Many cut issues come from reinstalling parts in the wrong order, not from the sharpening itself.
How to Sharpen Lawn Mower Blade Easily (File vs Grinder)
To sharpen a mower blade easily, focus on keeping the factory bevel angle close to what it already has. Most mower blades are in the neighborhood of 30–45 degrees, but you don’t need to “measure” it, just match the existing bevel.
Option A: Hand file (slow, simple, very forgiving)
- Clamp the blade securely, cutting edge facing you.
- File in one direction along the bevel, like you’re brushing material off the edge.
- Count strokes loosely so both sides get similar attention.
- Stop when the edge feels crisp and the worst nicks fade out.
This method takes longer, but it’s hard to overheat the metal, and it’s great if you only sharpen a couple times per season.
Option B: Grinder (fast, but easier to mess up)
- Use light passes, don’t press hard.
- Move continuously along the bevel to avoid digging a hollow.
- Pause often, heat buildup can soften the edge.
If the edge turns blue, that’s a sign of overheating and the steel may lose hardness. Many people keep a cup of water nearby for quick cooling, but avoid dunking a red-hot edge since rapid cooling can be harsh on some metals; in most homeowner sharpening, the better fix is simply lighter passes.
Balance Matters: The Step People Skip (Then They Blame the Mower)
A blade can be sharp and still cut poorly if it’s out of balance. It also can create vibration that’s rough on spindles and bearings.
After sharpening, check balance:
- Set the blade on a balancer cone, or hang it on a nail through the center hole.
- If one side drops consistently, that side is heavier.
- Remove a little metal from the heavier side, then re-check.

Quick rule: Don’t chase perfection for 20 minutes. You’re aiming for “doesn’t noticeably tip.” Small corrections usually do it.
Reinstall the Blade the Right Way (Torque, Orientation, and Test Cut)
Reinstalling is where small mistakes create big symptoms: uneven cutting, vibration, or bolts that loosen.
- Mount the blade in the same orientation as the photo you took.
- Clean the mounting surface so the blade seats flat.
- Tighten to the manufacturer torque spec if available.
According to Consumer Product Safety Commission (CPSC) guidance on lawn mower safety, proper maintenance and safe servicing practices help reduce injury risk. If you don’t have a torque spec, a service manual or a mower shop can usually tell you the typical range for your model.
After reinstalling, reconnect spark plug wire or battery, then do a short test cut in normal grass. If you feel new vibration, stop and re-check balance and mounting.
Time, Effort, and Tool Choice: A Practical Comparison
If you’re deciding how to sharpen lawn mower blade easily at home, this quick table can help you pick the method that fits your comfort level.
| Method | Pros | Cons | Best for |
|---|---|---|---|
| Hand file | Low cost, low risk, easy control | Slower, more elbow grease | Most homeowners, light wear |
| Bench grinder | Fast, consistent when practiced | Can overheat or remove too much metal | Regular maintenance, moderate nicks |
| Angle grinder | Very fast, portable | Easier to gouge, needs steady hands | Heavier wear, experienced DIY |
| Shop sharpening | Convenient, often includes balancing | Costs more, turnaround time | Limited tools, safety concerns |
Common Mistakes That Make Sharpening Feel “Hard”
- Sharpening both sides of the blade edge. Most mower blades have a single bevel per cutting edge, match what you see.
- Changing the angle dramatically. A steep angle dulls quickly, a thin angle chips easier.
- Taking off too much metal. You’re restoring an edge, not reshaping the blade.
- Skipping balance. The cut may look worse even though the blade feels sharp.
- Ignoring damage. A bent or cracked blade is a replacement decision, not a sharpening project.
Key takeaway: the job gets easy when you treat it like light maintenance, not like forging a knife.
When to Get Professional Help (or Stop DIY)
DIY sharpening is usually reasonable, but there are times to hand it off. If the blade has cracks, the mower shakes aggressively, or you suspect spindle or crankshaft damage, a technician can diagnose it safely. Also, if you’re uncomfortable tipping the mower, dealing with a seized bolt, or using power tools, paying for a shop sharpen can be the calmer option.
Conclusion: Your Next 20 Minutes Can Improve Every Mow
If you want to sharpen lawn mower blade easily, keep the bevel consistent, avoid overheating, and always check balance before reinstalling. Pick a method you’ll actually repeat, because regular light sharpening beats waiting until the blade looks destroyed.
This week’s simple action: inspect the blade edge, decide file vs grinder, and schedule a quick sharpen before your next mow. Your lawn will tell you pretty fast if you got it right.
FAQ
- How often should I sharpen a lawn mower blade?
Many homeowners sharpen every 20–25 mowing hours, but sandy soil, sticks, and frequent mowing can shorten that. If the cut looks ragged, that’s your practical signal. - Can I sharpen the blade without removing it?
Some people do, but it’s easier to do a consistent angle and proper balancing with the blade off. For safety, removal also lets you inspect cracks and bends more clearly. - Do I need a blade balancer?
It helps, and it’s inexpensive. A nail-through-the-center method can work in a pinch, but a balancer cone makes the result easier to trust. - What angle should I sharpen at?
Most mower blades fall around 30–45 degrees. In real life, matching the existing bevel tends to work better than trying to “optimize” an angle. - Is a sharper blade always better for grass?
Up to a point, yes, but a too-thin edge can nick and dull faster. A durable, clean edge is the goal, not a knife-like edge. - Why is my mower still cutting uneven after sharpening?
Common causes include a bent blade, unbalanced blade, deck height issues, or buildup under the deck. If vibration is present, stop and inspect before mowing more.
If you’re doing regular lawn maintenance and want a more hands-off approach, a local mower shop can sharpen and balance your blade while also checking for bends or hardware wear, which can save time when the issue isn’t just dullness.