Leather hole punch set is one of those tools that looks simple, until you’re staring at ragged holes, cracked edges, or snaps that won’t line up. The good news is most “bad holes” come from a few fixable causes: wrong punch style, dull edges, unsupported leather, or sizing that doesn’t match hardware.
If you make belts, straps, dog collars, key fobs, wallets, or bag tabs, clean holes are not cosmetic, they’re structural. A clean punch reduces tearing around rivets and keeps hardware seated, especially on heavier veg-tan.
This guide breaks down what to look for in a punch set, how to match hole sizes to common hardware, and the small setup habits that make your results look like you’ve been doing this for years.
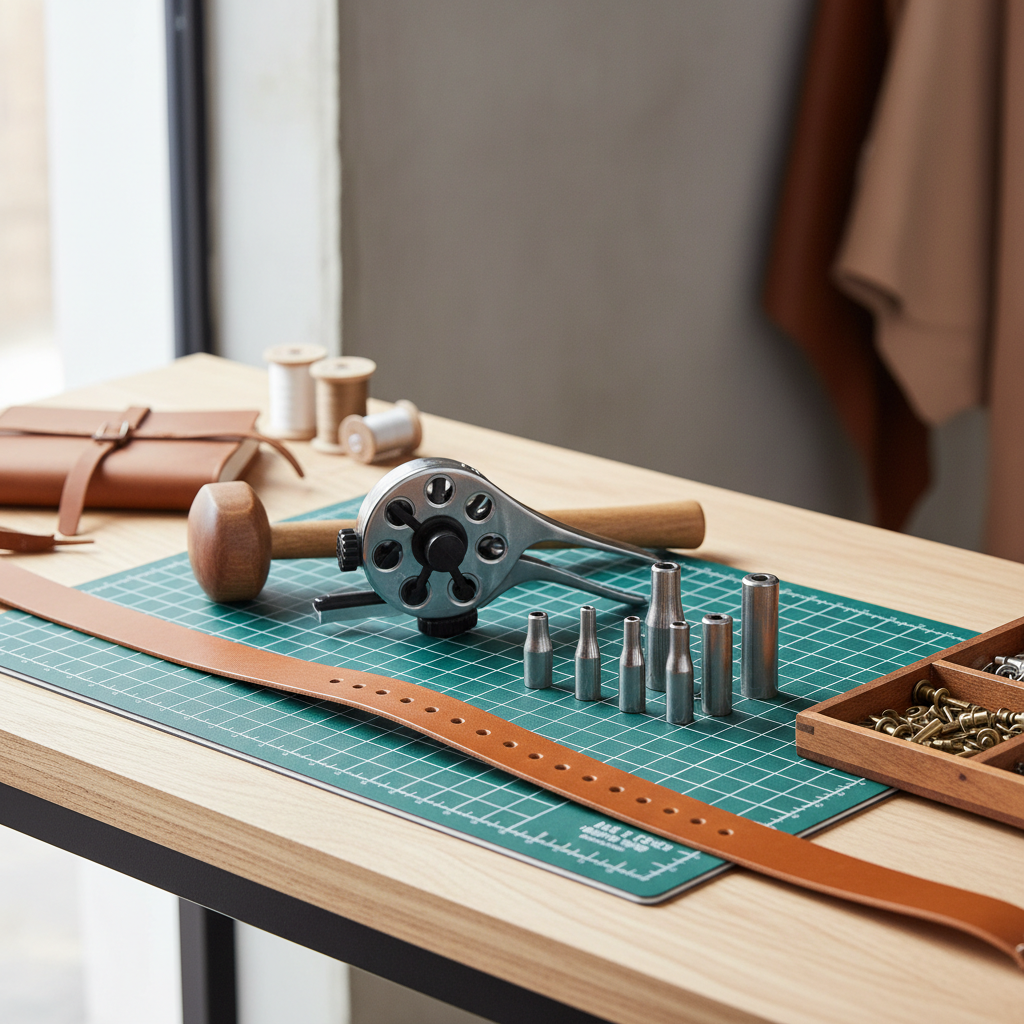
What a Leather Hole Punch Set Usually Includes (and What Each Part Is Good For)
In the U.S. market, a typical set falls into two families, and some kits combine both. Choosing the right family matters more than brand names in many cases.
Revolving (pliers-style) punch
This is the “handheld” punch with a rotating wheel of sizes. It’s fast for thin-to-medium leather and quick adjustments, great for straps and wearable items. Where it struggles is very thick stacks, super tough veg-tan, or when you need perfect vertical walls for hardware posts.
Drive punches (tube punches) + mallet
These are individual round tubes you strike with a mallet. They take longer to switch sizes, but they tend to cut cleaner holes in thick leather, and they’re easier to keep perfectly aligned when hole placement matters.
Common extras that actually help
- Cutting mat / punching pad: protects the punch edge and your table.
- Steel/wood mallet: a rawhide or poly mallet usually treats tools more gently than a metal hammer.
- Ruler, wing divider, or stitching groover: not “punch tools,” but they’re what make hole spacing look intentional.
According to OSHA, striking tools and hand tools should be used with appropriate protection and in good condition, since damaged tools can increase injury risk. In leatherwork terms, that translates to: stable surface, controlled hits, and replacing or sharpening dull punches.
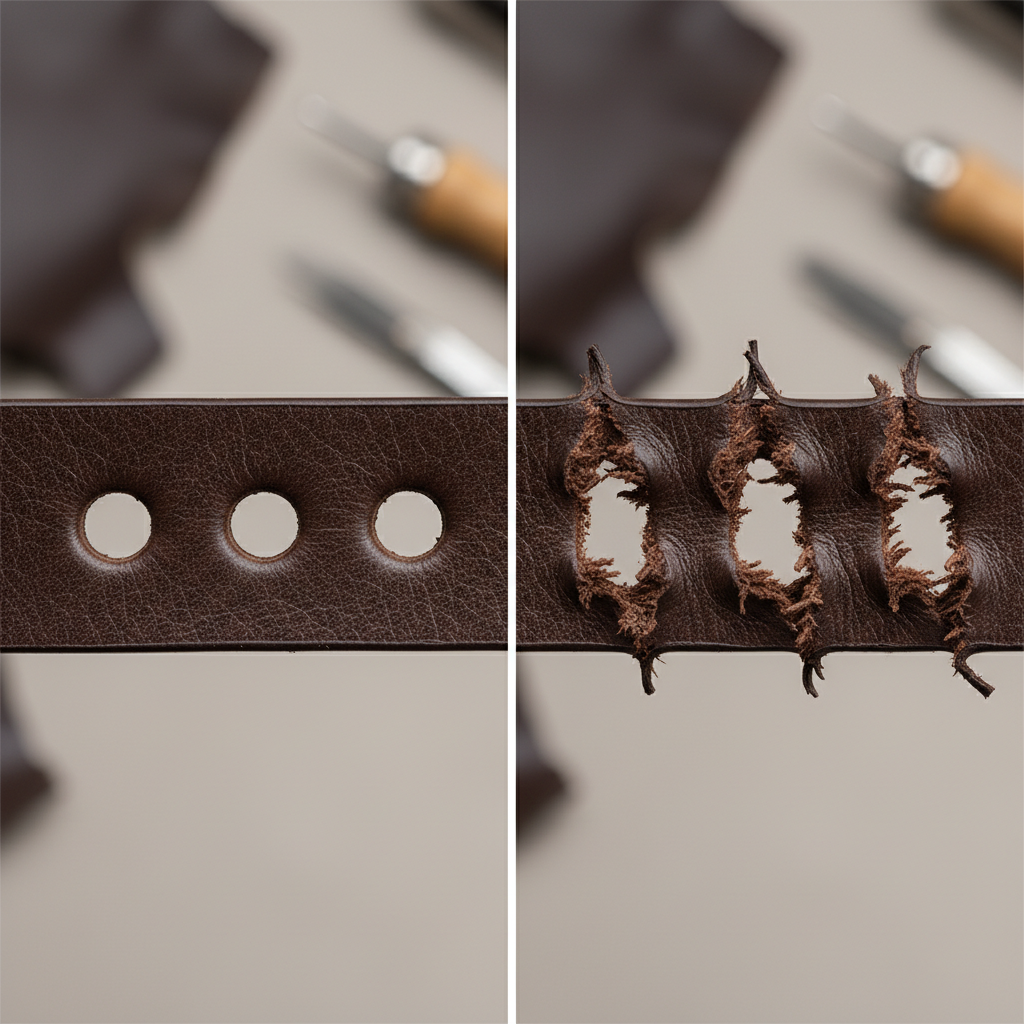
Why Your Holes Look Messy: The Real-World Causes
Before you replace your kit, it’s worth diagnosing what’s actually happening. A leather hole punch set can be fine, but the setup is off.
- Dull cutting edges: You’ll see fuzzy edges, partial cuts, or “pulling” instead of slicing.
- Wrong backing surface: Punching on a hard table can mushroom the punch edge and deform the hole. Punching on something too soft can “bounce” and leave incomplete cuts.
- Leather thickness mismatch: Revolving punches often struggle on thick or stacked leather, especially near edges where leverage is limited.
- Compression and stretch: Softer chrome-tan can stretch as you squeeze pliers, so holes end up slightly oval.
- Mis-sized holes for hardware: A hole that’s too tight makes snaps/rivets fight the leather, too loose makes hardware wobble and wear out faster.
- Punch not perpendicular: Slight tilt creates tapered holes, which looks sloppy and can affect how posts seat.
Quick Self-Check: Which Punch Setup Fits Your Project?
If you’re unsure which tool to reach for, this checklist keeps you from forcing the wrong tool and blaming the leather.
- You’re punching 1–2 layers of medium leather and want speed: a revolving punch usually works.
- You’re punching thick straps (belt blanks, collar bases) or stiff veg-tan: drive punches tend to give cleaner results.
- You need perfect alignment for hardware posts: drive punches plus a good mark-and-center routine wins.
- You’re doing lots of repeated holes (like production runs): consider a better pad, sharper punches, and a consistent measuring workflow.
- You often punch near edges: pliers can distort edges; a drive punch with solid backing can be more predictable.
One more honest check: if you feel yourself squeezing harder and harder, the issue is rarely “your grip.” It’s typically sharpness or backing.
Choosing the Right Leather Hole Punch Set: What to Prioritize
When shopping, many people focus on the number of pieces. That’s not the part that changes your results. What matters is cut quality, sizing, and how easy it is to keep the tool sharp.
Size range you’ll actually use
For crafts, a practical range is roughly 1 mm to 6 mm, but your hardware may push you bigger. If you only do belts, you might care more about the mid-to-large sizes than tiny ones.
Material and edge finish
Look for punches with a cleanly machined tube edge and consistent wall thickness. If the edge looks rough out of the box, it often stays rough unless you polish and sharpen.
Comfort and control
Revolving punches vary a lot in handle shape and spring tension. A set that “fits your hand” can reduce sideways torque, which reduces oval holes.
Replaceability and maintenance
Some kits include interchangeable tubes or offer replacement parts. That matters because even good punches become dull, especially if you punch into hard surfaces or hit metal accidentally.
Hole Size Guide: Matching Punch Sizes to Common Hardware
Hardware sizing is not perfectly standardized across brands, so treat this as a starting point. When in doubt, test on scrap from the same leather, same thickness, same finish.
| Use Case | Typical Hole Size Range | Notes |
|---|---|---|
| Small rivets / small posts | 2 mm–3.5 mm | Too tight can crack stiff veg-tan around the post. |
| Snaps (line 20/24 style) | 3 mm–5 mm | Often depends on post diameter and leather thickness. |
| Chicago screws | 4 mm–6 mm | Consider stack thickness, not just one layer. |
| Belts (adjustment holes) | 4.5 mm–6 mm | Many crafters prefer a slightly larger, cleaner cut for easier buckling. |
| Lacing holes | 2 mm–4 mm | For lace, spacing and edge distance matter as much as diameter. |
Key point: if hardware needs force to “push through,” you’re likely undersized, or the hole walls are torn instead of cut. A cleaner cut often solves the fight without increasing diameter much.
How to Punch Cleaner Holes (Step-by-Step, No Fancy Gear Required)
This routine works for most hobby and small-business crafting, and it’s the same workflow people “accidentally” develop after wasting leather. You can start now.
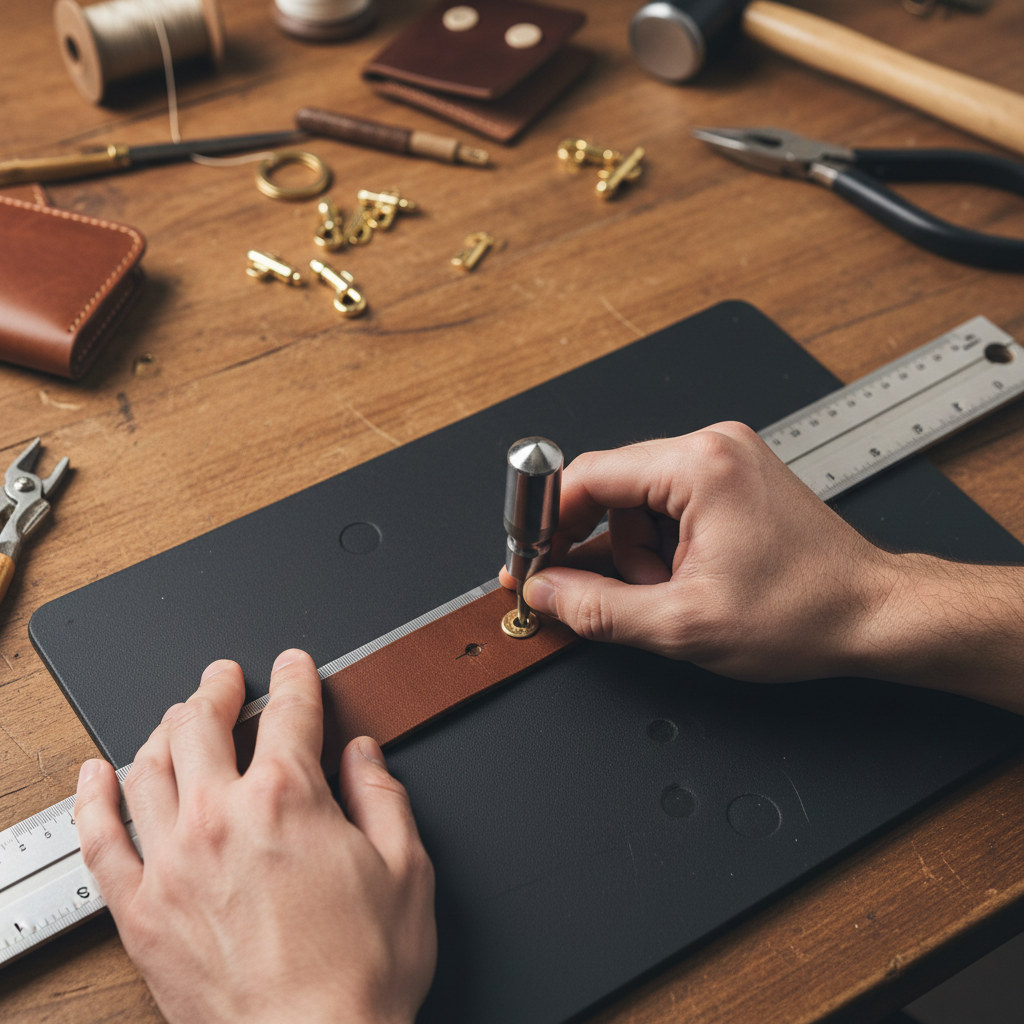
1) Mark, then center
Use a ruler and an awl to mark the point, then visually confirm edge distance. For straps, a simple centerline mark prevents the “drifting row” look.
2) Use the right backing
A dense poly punching board, end-grain wood, or a purpose punching pad supports the cut and protects the edge. Avoid bare concrete or metal surfaces even if it feels solid.
3) Keep the punch vertical
Whether you squeeze or strike, focus on a straight up-and-down path. If you’re using pliers, position the leather so the tool face sits flat, not angled off the edge.
4) Commit to the cut
Half punches tear. With a drive punch, one firm strike often beats three timid ones. With pliers, steady pressure beats a quick twist.
5) Clear the plug
Those little leather “dots” get stuck inside the tube and start ruining the next hole. Tap them out regularly, especially on softer leather.
- Pro habit: punch test holes in scrap whenever you change leather thickness or hardware batch.
- Small fix that helps: if the leather surface is delicate, a piece of painter’s tape over the mark can reduce surface scuffing, then peel it off after.
Common Mistakes and Safety Notes (So You Don’t Ruin Leather or Tools)
Most mistakes come from trying to power through. That usually costs more time than resetting the setup.
- Punching too close to the edge: leather can split, especially with tension from buckles or straps.
- Using a metal hammer on small punches: it can mushroom the tool head, making future strikes less controlled.
- Storing punches dirty: moisture and residue can lead to corrosion, which affects cut quality.
- Skipping eye protection: when striking tools, fragments and debris are uncommon but possible, protective glasses are a reasonable precaution.
If you’re working with very stiff leather, high force, or repetitive punching, hand fatigue is real. If pain persists, it may be worth adjusting tools, posture, or asking a professional for advice.
When It’s Worth Getting Help (or Upgrading Tools)
A leather hole punch set should not feel like a wrestling match every time. If you consistently see tearing even after changing backing and technique, a few scenarios are common.
- You need sharper tooling: upgrading to better-machined drive punches or a higher-quality revolving punch can make a noticeable difference.
- You’re doing small-batch production: a press-style punch or arbor press setup can improve consistency and reduce strain.
- You’re mixing materials like webbing, plastic, or metal layers: you may need specialized punches and safer clamping methods.
For sharpening or repair, a local leather supply shop, maker space, or tool sharpening service can often point you in the right direction. If you’re unsure, bring the punch and a scrap piece, it makes the conversation much more practical.
Conclusion: Clean Holes Come From Matching Tool, Leather, and Setup
A leather hole punch set earns its keep when you treat it like a cutting tool, not a brute-force tool, sharp edge, solid backing, correct sizing, and a calm marking routine usually beat buying yet another kit. Pick one project you care about, test on scrap, dial in your hole size for the hardware, then repeat the same setup every time. That consistency is what makes handmade work look “finished.”
Action ideas for your next session: set up a dedicated punching surface, then create a tiny “size chart” on scrap with labeled holes so you stop guessing mid-project.
FAQ
What size leather hole punch do I need for snaps?
It depends on the snap post diameter and leather thickness, but many snap installs land in the 3–5 mm neighborhood. Test on scrap first, if the snap post has to force through, try a cleaner punch or a slightly larger size.
Why does my revolving punch make oval holes?
Usually the leather shifts as you squeeze, or the tool face sits at a slight angle. Slowing down, supporting the strap flat, and using a sharper tube can reduce ovaling, for thick leather, a drive punch is often easier.
Can I punch holes in very thick belt leather with a plier punch?
Sometimes, but it’s hit-or-miss depending on the punch quality and your leverage near the edge. For thick veg-tan belt blanks, a drive punch and mallet often cut cleaner with less strain.
What should I punch leather on to avoid dulling the punch?
A dedicated punching pad, dense poly board, or end-grain wood are common choices. Hard surfaces like metal or concrete can damage the cutting edge quickly.
How do I keep the punch tubes from clogging?
Clear plugs frequently during a session. If plugs stick, a thin wire or tap on the bench can help, just avoid scraping the cutting edge.
Do I need to sharpen a leather hole punch set?
Many people eventually do, especially with frequent use. Light honing and polishing can improve cuts, but if you’re not confident, a sharpening service or experienced maker can help you avoid changing the punch geometry.
How far from the edge should I punch holes in straps?
There isn’t one universal rule because leather type and load matter, but too close raises the chance of splitting under tension. When the strap will carry load, leaving more edge margin is usually safer, and testing on scrap is the simplest reality check.
If you’re building out a small leather toolkit and want a more predictable workflow, start with a punch set that matches your typical leather thickness, add a proper punching pad, and keep a scrap “test strip” near your bench, it’s the simplest way to get cleaner holes without overthinking every project.