Ball joint separator tool problems usually show up at the worst time: the joint will not pop free, the rubber boot tears, or you run out of clearance near the knuckle and CV axle. The good news is most headaches come down to picking the wrong separator style, setting it up at a bad angle, or skipping a few small prep steps.
If you do your own suspension work, the separator choice matters more than people think, because ball joints and tie rods vary a lot by vehicle and by rust level. One tool can feel perfect on a clean Southwest truck, then fail miserably on a salted-road sedan with a seized taper.
This guide breaks down the common separator types, how to match them to the job, a quick “am I about to ruin this boot” checklist, and a practical workflow that reduces stuck tapers and accidental damage.

What a ball joint separator tool actually does (and why tapers get stubborn)
Most ball joints and tie-rod ends mount with a tapered stud seated into a matching tapered hole. When the nut is tightened, the taper “locks” by friction, so the stud can hold load without wobble. That also means, once it has lived through heat cycles, corrosion, and years of steering forces, it can feel welded in place.
Separation tools work by applying force in one of two ways: either a wedging action that pushes the taper apart, or a pressing action that drives the stud out while supporting the knuckle. Pressing styles tend to be more controlled, while wedging styles can be faster but rougher on boots.
According to OSHA (Occupational Safety and Health Administration), hand and power tool injuries often come from misuse, slipping, or uncontrolled force, which is exactly the risk zone when a taper suddenly “pops” free. So the goal is controlled force, stable support, and eye protection.
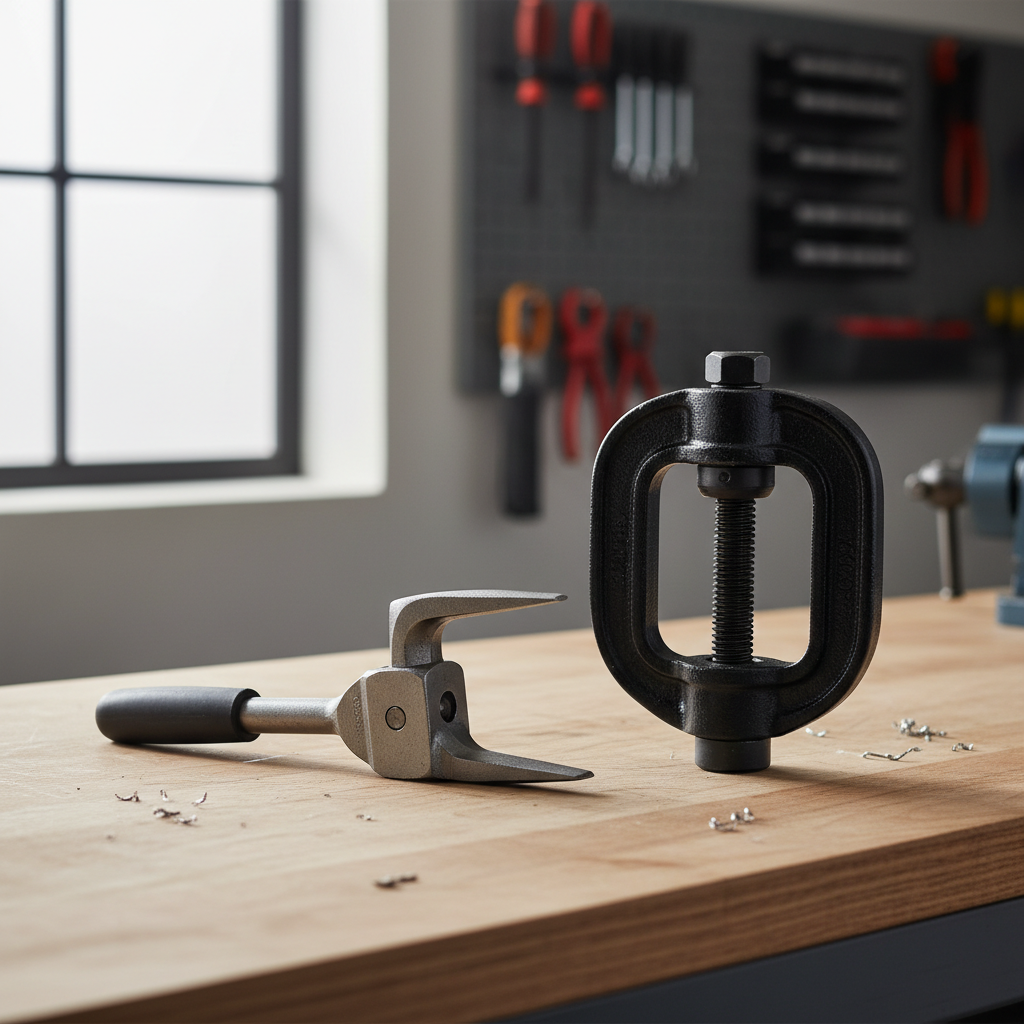
Types of ball joint separators: pick the style before you pick the brand
People search for a ball joint separator tool and end up with “a tool,” then wonder why it does not fit. In practice, you usually choose a style first, then size and build quality.
Common separator styles
- Pickle fork (wedge): quick, inexpensive, often damages boots, good when you are replacing the joint anyway.
- Screw-type separator (press): a U-shaped frame with a forcing screw, more controlled, often boot-friendly if positioned well.
- Scissor (two-jaw) separator: compact pressing action, useful where clearance is tight.
- Ball joint press kit (C-clamp press): used more for pressing joints in/out of control arms, sometimes helps with separation depending on adapter access.
Quick matching advice
- If the boot must survive, lean toward a screw-type or scissor separator.
- If you already bought replacement joints, a pickle fork is often the fastest route.
- If clearance is your enemy, pick compact tools and measure the gap before ordering.
Fast self-check: are you set up to succeed?
Before you put serious torque on anything, pause and run this checklist. It saves time, and it saves parts.
- Replacement plan: Are you reusing the ball joint or tie-rod end, or replacing it? If replacing, boot damage matters less.
- Nut position: Is the nut backed off but still threaded a few turns to catch the stud when it releases?
- Clearance: Can the separator sit squarely without contacting the boot, ABS wire, or CV axle?
- Support: Is the knuckle/control arm supported so the force goes into the taper, not into a flexing assembly?
- Rust reality: Visible corrosion around the taper usually means you need penetrant, patience, and sometimes heat.
- Tool fit: Does the jaw opening and throat depth actually match the joint size, without riding on the boot lip?
Step-by-step: how to use a separator without turning it into a wrestling match
Ball joint separator tool use is mostly about setup and sequencing. The actual “pop” moment is quick, everything before it decides whether it is controlled or chaotic.
1) Prep the taper area
- Brush off loose rust and dirt so penetrant can reach the seam.
- Apply penetrating oil at the taper interface, give it time. Many situations improve with a second application after a few minutes.
2) Loosen the nut, but do not remove it
- Back the nut off until it is flush with the stud end or a few threads engaged.
- This helps prevent sudden drop and protects threads if the tool slips.
3) Set the separator square and protect the boot
- On screw-type tools, align the forcing screw with the stud centerline as closely as possible.
- If you need to reuse the joint, avoid any contact that pinches the rubber boot.
4) Apply force gradually, then reassess
- Tighten the forcing screw in small increments, watching for tool walk-off.
- If nothing happens, stop and change something: more penetrant, better support, different angle, or a different separator style.
5) Use “shock” carefully when appropriate
A light, controlled strike on the knuckle near the taper can help break friction, but it is easy to overdo it. If you are unsure, it may be safer to avoid hammering near bearings, sensors, or aluminum components, and consult a service manual or a professional tech.
Tool selection table: what to buy for your most common jobs
If you are building a small DIY kit, you do not need every option, but you do want the right coverage for your vehicle mix.
| Job | Recommended separator | Why it works | Watch-outs |
|---|---|---|---|
| Tie-rod end removal (reuse part) | Screw-type or scissor separator | Controlled force, less boot risk | Needs clearance, must stay square |
| Lower ball joint (replacing anyway) | Pickle fork | Fast, works even when seized | Usually tears boots, can mar surfaces |
| Upper ball joint with tight access | Compact scissor separator | Fits in cramped knuckle areas | Size range limited |
| Press-in ball joint service | C-clamp ball joint press kit | Designed for pressing joints in/out | Adapter selection and alignment matter |
| Rust-belt suspension teardown | Screw-type + pickle fork backup | Controlled attempt first, wedge as fallback | Higher chance of broken hardware |
Common mistakes that waste time (or break parts)
- Using a pickle fork when you plan to reuse the joint, then acting surprised when the boot rips.
- Cranking the forcing screw while the tool sits crooked, which strips threads or launches the tool when it slips.
- Removing the nut completely, letting the knuckle drop, stressing brake hoses or ABS wiring.
- Ignoring clearance, especially near CV axles where tool contact can nick a boot and create a future grease leak.
- Over-hammering on aluminum knuckles or near wheel bearings, which can create expensive side effects.

When you should stop and get professional help
Some jobs cross the line from “tight taper” into “this could get unsafe or very expensive.” In these cases, a shop may have better access to a lift, heat tools, air hammers, and the experience to avoid collateral damage.
- The stud spins and you cannot get the nut off without risking thread damage.
- The knuckle is aluminum and you are not sure where it is safe to apply force or heat.
- You see torn boots on a CV axle or brake hose strain, and continuing might create a safety issue.
- The separator tool is bending, slipping, or the forcing screw feels like it will strip.
According to NHTSA (National Highway Traffic Safety Administration), vehicle component failures can affect control and safety. If you are unsure your suspension or steering is reassembled correctly, a professional inspection is a reasonable next step.
Key takeaways and a practical plan
If you want fewer stuck tapers and fewer torn boots, treat separator work as setup-first, force-second. Keep two approaches on hand, a controlled press-style separator for reuse jobs and a wedge-style fork when parts are headed to the trash anyway.
- Reuse the joint? Choose screw-type or scissor, protect the boot.
- Replacing parts? A pickle fork can be the fastest tool.
- Rust present? Add penetrant time, better support, and patience before doubling force.
If you are planning a weekend suspension refresh, pick one primary separator that fits your common vehicles, then add a backup method. That combo is often more useful than buying a single “universal” tool and hoping it fits every knuckle you meet.
FAQ
What is the best ball joint separator tool for DIY mechanics?
Many DIYers do well with a screw-type separator because it applies steady pressure and can be gentler on boots. If you work on older, rusty vehicles, keeping a pickle fork as a fallback can save time when the taper refuses to cooperate.
Will a pickle fork always destroy the boot?
Often it does, because the wedge spreads the joint at the boot location. Sometimes you get lucky, but if boot condition matters, it is smarter to plan for a press-style separator instead of betting on luck.
How do I know what size separator I need?
Measure the gap around the joint and compare it to the tool’s jaw opening and throat depth. “Fits most” can still miss on thicker knuckles or when the stud sits deep, so checking dimensions before buying avoids returns.
Why does the stud spin when I try to loosen the nut?
The taper may have partially released, so the stud no longer locks in the knuckle. In many cases, applying upward pressure to reseat it temporarily can help, but if it keeps spinning you may need a different approach or a technician’s help to avoid thread damage.
Can I use heat to free a ball joint taper?
Heat can help in some situations, but it also adds risk near rubber boots, grease, sensors, and aluminum parts. If you are not comfortable judging safe heat placement and duration, it is worth asking a pro or following a vehicle-specific service procedure.
Do I need an alignment after ball joint or tie-rod work?
Often, yes, especially after tie-rod end replacement or any work that changes steering geometry. Even when you mark positions, the result can still be slightly off, and uneven tire wear is not a fun surprise.
Is a ball joint press the same as a separator?
Not exactly. A press kit is mainly for pressing joints in and out of control arms, while separators are aimed at popping a tapered stud free from a knuckle. Some press kits can help with separation in certain setups, but it depends on access and adapters.
What lubricant should I use on the forcing screw?
Many forcing screws benefit from a dab of grease or anti-seize on the threads to reduce galling and make torque smoother. Keep lubricants off surfaces where you need friction, and follow the tool maker’s guidance if they specify one.
If you are working through a stubborn front-end job and want a more predictable setup, it helps to choose a separator style based on whether you are reusing parts, then confirm sizing from your knuckle clearances before ordering, that small step usually prevents most “this tool doesn’t fit” frustration.